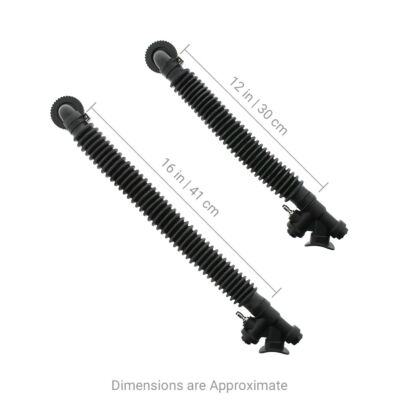
Dive Rite Wing Replacement Parts
Parts are sold with special terms of: NO warranty, NO return, and NO support. Your complete satisfaction is our goal, so please consider carefully before ordering parts.
The elbows do not include the hardware to connect the pull-cable to the power inflator, nor the gasket typically required to connect the elbow to the wing, nor any hardware to secure the inflator to your corrugated hose.
p>Replacement wing parts for Dive Rite brand wings.- Complete Inflation Assemblies include non-exhaust (aka plain) or remote-exhaust elbow, corrugated hose, and K-style oral/power inflator completely assembled with hose clamps.
- Bladder Flange Gasket is NOT included with any elbows or complete assemblies. Dive Rite Remote Exhaust Elbows do NOT include the cable pin.
- Corrugated Hoses in your choice of three lengths: 12-inch, 16-inch and 22-inch. The length measurements are approximate because the corrugated hose can stretch over time and with use, the length will change.
| Brand | Dive Rite |
|---|---|
| SKU | DR-WNGPTS |
| Weight | 0.100000 |
Customer Reviews
 WARNING
Availability of sub-assemblies and components, repair parts, specialized tools and maintenance manuals does not imply qualification to assemble and/or service scuba equipment.
Most authorized dealers are able to perform warranty, repair and service work on your equipment. Service by other than an authorized dealer may void the warranty. Improper service of dive equipment can lead to serious injury or death.
Dive Gear Express recommends that divers participating in more advanced technical and exploration type diving be trained in equipment service. We recommend that non-qualified individuals seek professional training/mentoring before attempting repairs or servicing on any diving equipment.
Replacing Air Cell Inflation Assembly Elbows
Removing and replacing an air cell elbow must be done correctly; otherwise damage may result. The most important thing to remember is to turn only the collar at the base of the hose elbow, and not the elbow itself. Turning the elbow results in either loosening or damaging the flanges that mate the elbow to the air cell bladder. The video illustrates using a tool to turn the collar, but frankly the best tool to use is simply to turn the collar by hand.
When installing or reinstalling the elbow, make certain the gasket is centered in place between the elbow flange and bladder flange. As you tighten the collar, avoid cross threading by first turning counterclockwise until you hear a click. As you begin turning the collar clockwise, you will feel the elbow seat into the flange and lock into one of several possible positions. If the elbow assumes the wrong position, loosen the collar, reorient the elbow and begin again.
After tightening the collar as far as it will go, fully inflate the air cell and check for leaks. The air cell should be able to remain fully inflated for several minutes without exhibiting any substantial air loss. You may find the gasket has compressed after a few days and you will need to snug up the collar again, tightening one eighth to one quarter turn by hand.


